


SMARTbase: Bringing Versatility to Implant Restorations
Clinicians today want to eliminate possible dental implant restorative complications and fabricate restorations with longevity and repairability built into the design. Ideally, all implant restorations would be retrievable without compromising the integrity of the prosthetic. Screw-retained restorations, which have historically required more accurate implant positioning than cement-retained, have several advantages—ease of removal or retightening, known retention, increased retention of short teeth and when limited interocclusal space exists, and most of all, assurance of no lurking cement.
The detrimental effects of residual cement can be catastrophic and have been well documented. Many clinical cementation techniques are used in an attempt to control the amount of cement and to contain its subgingival migration. However, the only way to be certain there is no cement present at the implant platform-abutment interface is to eliminate it from intraoral use.
The inability to angle an implant ideally for screw retention arises with the relationship of teeth to the bone or the lack of bone quality or quantity. In some cases, the available bone to establish initial primary stability is located in areas that will not allow the long axis angulation of the implant to be in an ideal position for a screw-retained restoration. This is often the case in the anterior, where an immediate implant placement will give the best esthetic result. The need has existed for a screwretained prosthetic solution when the long axis of the implant does not coincide with the lingual or occlusal aspect of the final restoration.
When evaluating sagittal root position in relation to the maxillary osseous housing for immediate implant placement, the bone is rarely available in the ideal position—less than 1% of patients present with the ideal Class III sagittal root position.1 Given this infrequency, the majority of anterior implants are restored with a cemented restoration.
Enabling Screw-Retained Implants
Custom implant abutments have evolved to bring versatility to implant restorations that are esthetically pleasing, biomechanically strong, retrievable, and free of biological detriment. These include the 2-piece hybrid abutment, a titanium base layered with lithium disilicate or zirconium. The ability to torque a screw off axis to 30-plus Ncm has led to the concept of angled screw channels that provide the flexibility to change the axis of engagement from the long axis of the implant. For restorations that traditionally would have been cemented, this provides the ability to be screw retained and for screw channels to be shifted to accommodate adequate material thickness to prevent fracture.
The Smart Choice for Flexibility
The SMARTbase abutment from Implant Direct has multiple features that allow more flexibility than previous base options for placement, esthetic outcome, and fabrication. SMARTbase has the freedom to redirect the screw access channel from 0° to 25° for both anterior and posterior implant restorations. The fabrication process can entail a digital approach using a scan body or burnout coping for a traditional wax sleeve and pressed restoration.
CASE 1: Restoration of Fractured Canine
The patient presents with a fractured maxillary left canine that is deemed unrestorable (Figure 1). The treatment plan is for extraction, immediate implant placement, a dual-zone bone graft on the facial, and a screw-retained provisional to act as a tooth replacement and prosthetic socket seal (Figures 2, 3).

After the 4-month osseointegration healing of the implant, the provisional is removed and a custom screw-retained impression coping is fabricated to make the final impression (Figure 4). A PEEK/ titanium scan adapter is used to transfer the analog model into the digital realm.
A SMARTbase abutment will be used to modify the axis of engagement, and the timing of that abutment will be rotated to place the axis in an ideal lingual position. The green line (Figure 5) represents the long axis of the implant and the path of screw insertion with a traditional abutment and screw. The axis of screw engagement is modified 17.1° for an ideal torque engagement position. The final contours of the abutment are modifi ed for ideal emergence profile, soft-tissue support, and margin location. The abutment is milled out of zirconia and test-fitted on the SMARTbase to ensure accuracy of fit. The final restoration is then waxed to ideal contour and pressed out of lithium disilicate (Figure 6).

Before the zirconia abutment is bonded to the titanium SMARTbase, the screw is changed from the laboratory screw to the final screw as it will not have an angle of exertion once the two pieces are connected. The final lithium disilicate crown will not be bonded to the zirconia until it has been tried in the mouth, the color of the final restoration has been approved, and the interproximal contact adjusted (Figure 7). After approval, the final restoration is bonded to the abutment on the model. The restoration is then removed from the model, the margins polished with a rubber wheel, and any excess cement removed.
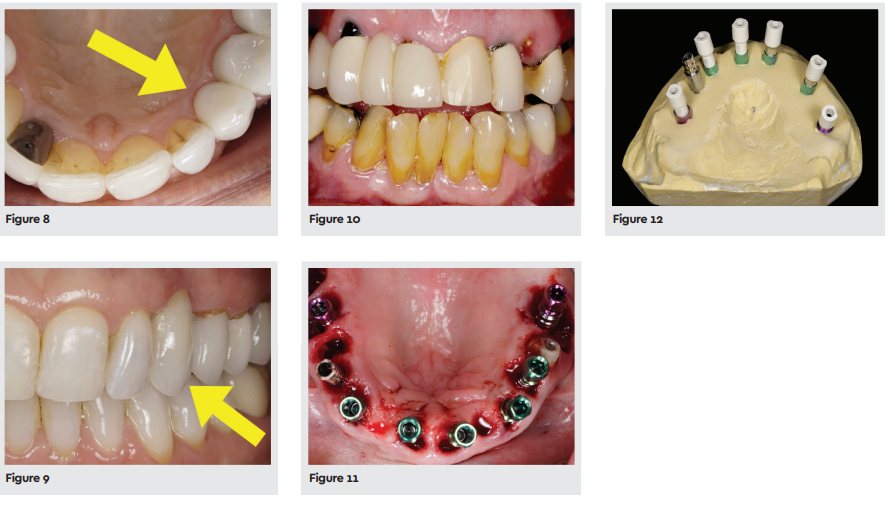
The four components of the final restoration—the final screw, SMARTbase, zirconia abutment, and lithium disilicate crown— are now all connected and ready to be torqued into the implant. The zirconia abutment is luted to the SMARTbase with Multilink Hybrid Abutment (Ivoclar Vivadent) and the crown is bonded to the zirconia with PANAVIA V5 (Kuraray). The final restoration is torqued to 30 Ncm, the access filled with composite resin, and polished (Figures 8, 9).
CASE 2: Maxillary Arch Rehabilitation
The patient presents with a fractured maxillary left canine that resulted from a fall. She has also come to the realization that many of her teeth need to be addressed (Figure 10). Diagnosis includes advanced periodontal disease, a vertical facture on the distal abutment of a 3-unit bridge on No. 6, periapical lesions on Nos. 9, 10, 12, and 14, and furcation involvement on Nos. 2, 3, and 14. It is agreed the maxillary arch will be rehabilitated and only No. 13 will be saved in this arch. The existing implant at No. 5 will also be salvaged.

In one sitting, the hopeless teeth are extracted as atraumatically as possible without laying a flap. Seven immediate implants are placed in positions 3, 6, 8, 9, 11, 12, and 14 (Figure 11). PEEK temporary abutments are placed and screwretained provisionals fabricated from a diagnostic wax-up. The occlusal load of the upper arch will be placed entirely on the existing implant No. 5 on her upper right and the remaining tooth No. 13 on her upper left. The patient’s existing anterior open bite will remain throughout the integration of the implants.
The provisional restoration is removed at 4 months post extraction. Healing is evaluated and the integration of the implants confirmed. The implant at No. 11 failed to integrate and will be removed, and an initial impression taken to fabricate a new full-arch provisional.
From the first model, an impression jig will be fabricated for a more accurate final impression and splinting the implants together that will be connected in the final design, utilizing open-tray impression copings and a custom impression tray. It’s critical that the final design of the restorations is planned and decisions made regarding the implants that will be splinted, type of abutments used, final material of the case, and which implant restorations will engage the implant platforms so that information can be captured in the final impression.
When the implant position was evaluated in relation to the final tooth position, it was decided that implants 3, 6, 12, and 14 would need angulation modification and would use an engaging SMARTbase abutment, and the timing of these implants would be relayed to the final model by not removing the hex from those impression copings.
Individual scan adapters are placed in each analog and the final abutment on implant No. 5, and the model is scanned (Figure 12).
Once in the CAD/CAM software, the position of the implants in relationship to the final tooth position is evaluated and the angle correction on the SMARTbase abutments is modified (Figure 13). The timing of the abutments in the implants can be changed and evaluated digitally to determine the final rotation of the SMARTbases in the implants and the axis that will best serve the final restorations.
Once the framework is designed, it’s milled out of zirconia (Figure 14). The final screws will be placed in the SMARTbases and the restorations will be bonded to the abutments using Multilink Hybrid Abutment (Figure 15).

All of the milled bases are anodized gold, and the hexes on the SMARTbases have not been modified (Figure 16).
The provisional restorations are removed, the implants flushed with chlorhexidine, and the final implant restorations torqued to 30 Ncm.
The access channels are filled with composite resin and polished (Figure 17).
The smile is complete (Figure 18).
SMARTBASE

SMARTbase CAD/CAM engaging abutments combine a dual-hue finish for enhanced esthetics and freedom of choice with screw-retained restorations. The gold anodization allows for the use of more translucent restorative materials, while the pink anodization of the titanium base offers a more natural blending with gingival tissue. The concave transgingival profi le shapes tissue growth for a thicker gingival cuff, reducing the chance of the abutment showing through while enabling subcrestal placement.

Dr. White attended the University of Missouri-Kansas City School of Dentistry, receiving his DDS degree in 2007. After dental school, he relocated to Las Vegas and started a scratch startup and has been a full-time solo practitioner for 15 years. Since 2015, Dr. White has taught clinical, technical, and management courses worldwide to dentists, dental technicians, and their teams. He maintains a commercial dental laboratory specializing in highly esthetic restorations and patientdentist-technician communication. He founded the White Institute in 2021, an intimate education center in Las Vegas, dedicated to helping other dentists reignite their love for dentistry
